How to Dump PS2 BIOS From Your Console — Complete Guide 2026 (Modded and Unmodded)
Tried setting up PCSX2 or AetherSX2 and getting a blank screen or “BIOS not found” error? The problem is simple. Your emulator needs a PS2 BIOS file before it can run a single game. And the only fully legal, most reliable way to get that file is by dumping it directly from a PlayStation 2 console you personally own.
This guide covers every method available in 2026, works for both modded and unmodded consoles, covers every PS2 model from Fat to Slim, and takes less than 30 minutes from start to finish.
Table of Contents
What Is PS2 BIOS Dumping?
BIOS dumping means copying the firmware stored permanently inside your PS2 hardware and saving it as a file on a USB drive or computer. The PS2 BIOS chip stores exactly 4MB of firmware that Sony engineers embedded into every PlayStation 2 console ever manufactured. This firmware manages everything from the startup sequence and hardware initialization to region locking, memory card management, and game loading.
Emulators like PCSX2 and AetherSX2 need that exact firmware to recreate the PS2 environment accurately. PCSX2 does not bundle a BIOS file because Sony owns the copyright. Without it, the emulator refuses to start entirely.
A self-dumped BIOS is always better than any file downloaded from the internet. Files dumped directly from hardware are complete, unmodified, matched to your specific console region, and carry no risk of malware or corruption that third-party downloads routinely contain.
Why Dumping Your Own BIOS Is the Right Choice
Most PS2 emulation guides skip this explanation entirely. Here is why dumping matters beyond just getting a file.
Legal protection. The PS2 BIOS is copyrighted software owned by Sony Interactive Entertainment. Downloading it from third-party websites is a copyright violation in most countries. Dumping from a console you own is a legally safe personal backup under fair use principles in most jurisdictions.
Better accuracy. A dumped BIOS is the unaltered original Sony firmware. Many files circulating online have been renamed, partially stripped, or modified. Using your own dump ensures the emulator replicates original PS2 behavior with complete accuracy.
Game compatibility. Certain PS2 games depend on specific BIOS-level functions that some truncated online files lack. A complete dump contains all required modules, including rom1.bin, rom2.bin, erom.bin, and nvm.bin, which affect DVD player functions and system memory behavior.
Hardware preservation. The PS2 is now over 24 years old. Optical drives fail. A complete BIOS backup means you never lose your firmware, even if the console stops working.
PS2 BIOS File Details
| Detail | Information |
| Main BIOS File Size | Exactly 4,194,304 bytes (4MB) |
| File Format | .BIN |
| Supporting Files | rom1.bin, rom2.bin, erom.bin, nvm.bin |
| Recommended Dumper Tool | biosdrain.elf by F0bes (GitHub) |
| Dump Duration | 1 to 15 minutes |
| Compatible Emulators | PCSX2, AetherSX2, NetherSX2, DamonPS2, RetroArch |
Everything You Need Before Starting Dump
The exact items required depend on which method you choose, but here is the complete list across all methods.
Hardware:
A working PlayStation 2 console. Both Fat models (SCPH-30000 to SCPH-50000) and Slim models (SCPH-70000 to SCPH-90000) are fully supported by the methods below. The console needs to read memory cards and detect USB drives normally.
A USB flash drive between 1GB and 16GB in capacity. Format it as FAT32 with MBR (Master Boot Record) partition scheme before use. USB 2.0 drives are strongly preferred. The PS2’s USB driver has documented compatibility problems with many USB 3.0 drives. If your drive is not detected, switching to an older USB 2.0 model fixes the issue in almost every case.
Software:
biosdrain.elf from F0bes’ GitHub repository. This is the BIOS dumper tool recommended by the official PCSX2 documentation. It reads the firmware from your PS2’s BIOS chip and writes all required files to your USB drive. It makes absolutely no changes to your console during or after the process.
uLaunchELF or its modern continuation wLaunchELF. This is a homebrew file manager that runs on PS2 and lets you browse your USB drive and launch programs. FreeMcBoot and FreeDVDBoot both include uLaunchELF bundled inside them automatically.
A method to run homebrew on your PS2. This is either FreeMcBoot (memory card-based), FreeDVDBoot (DVD-based), Fortuna, or a hardware modchip. Each method is explained fully below.
Check Your PS2 Model Before Choosing a Method For Dumping
Your PS2 model number is printed on the sticker on the bottom of the console. It starts with “SCPH” followed by five digits. This determines which dumping method works for your specific hardware.
| PS2 Model | FreeMcBoot Compatible | FreeDVDBoot Compatible |
| Fat models SCPH-30000 to SCPH-50000 | Yes | Specific DVD firmware versions only |
| Early and Mid Slim SCPH-70000 to SCPH-79000 | Yes | Yes |
| Late Slim SCPH-9000x with date code over 8B | No | Yes |
The date code is visible on the sticker on the back of the console. If your date code is larger than 8B and your model starts with 9, use FreeDVDBoot instead of FreeMcBoot.
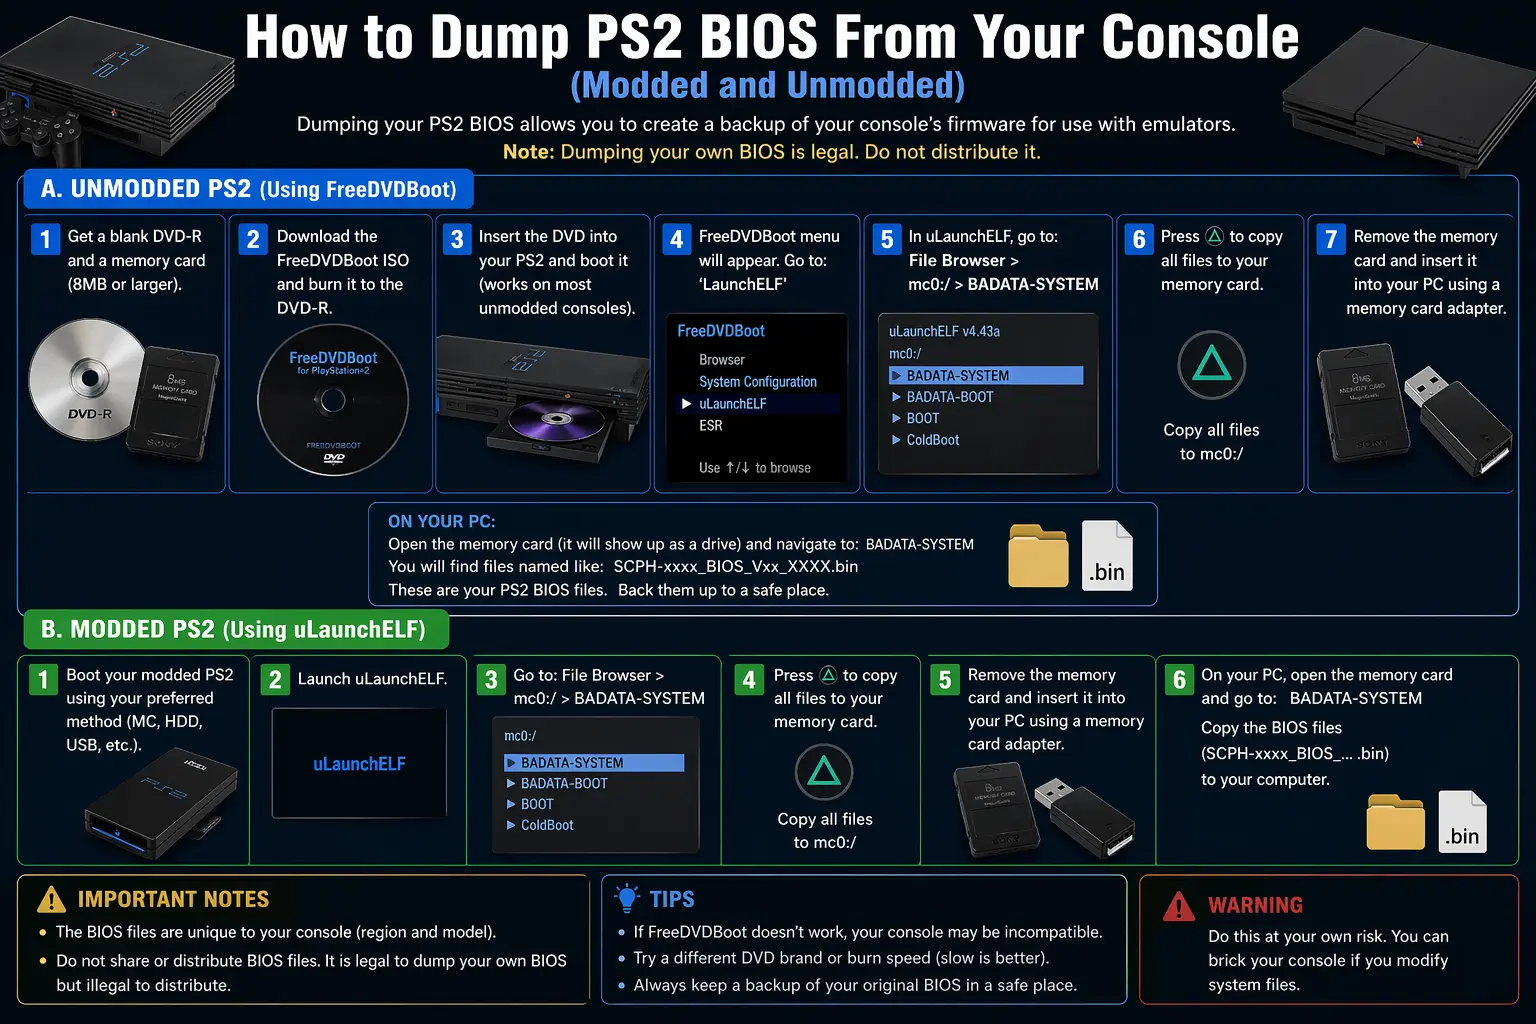
Dumping Method 1: FreeMcBoot — Easiest and Fastest (Modded Consoles)
FreeMcBoot (FMCB) is a softmod that lives on a standard 8MB PS2 memory card. It exploits a vulnerability in the PS2’s memory card loading system to launch homebrew software without any hardware modification. The process makes zero permanent changes to your console.
FreeMcBoot works on virtually all Fat models and early to mid Slim models. The entire process takes 5 to 10 minutes.
Getting a FreeMcBoot card: These are sold pre-loaded on Amazon and eBay for $10 to $15. They are ready to use immediately. Do not store game saves on these cheap cards. Use them only for launching homebrew.
Step 1. Copy biosdrain.elf to the root of your FAT32-formatted USB drive. Place it directly in the root folder, not inside any subfolder. The PS2 looks for files in the root only.
Step 2. Insert the FreeMcBoot memory card into Memory Card Slot 1. Ensure no disc is in the drive tray.
Step 3. Power on your PS2. The FreeMcBoot custom menu appears instead of the standard PS2 browser screen.
Step 4. Select uLaunchELF from the menu. It may also appear as wLaunchELF or LaunchELF, depending on your FMCB version. All three work identically for this purpose.
Step 5. Plug your USB drive into the front USB port of the PS2.
Step 6. Navigate to the device labeled mass: inside uLaunchELF and open it. This is your USB drive. If mass: shows empty, your USB drive is not detected. Switch to a different USB 2.0 drive and try again.
Step 7. Locate biosdrain.elf in the file list and press Circle to launch it.
Step 8. The screen may go black briefly. This is completely normal. Do not touch anything. Wait patiently for the message “Finished Everything” to appear on screen. The dump takes between 1 and 5 minutes on most models.
Step 9. When “Finished Everything” appears, power off the PS2 and remove the USB drive.
Dumping Method 2: FreeDVDBoot — For Completely Unmodded Consoles
FreeDVDBoot is the correct method for stock PS2 consoles with no modifications. It exploits a vulnerability in the PS2’s DVD video player to load homebrew from a burned disc. It requires no hardware modification, no memory card purchase, and makes no permanent changes to the console.
FreeDVDBoot works on all Slim PS2 models and on specific Fat models, depending on DVD firmware version. The FreeDVDBoot GitHub repository maintained by developer CTurt contains a full model compatibility list and model-specific ISO files.
Step 1. Visit the FreeDVDBoot GitHub repository and download the correct ISO for your PS2 model. Check the compatibility list for your specific SCPH model number.
Step 2. Burn the ISO to a blank DVD-R disc at 4X speed. Use DVD-R media specifically. DVD+R compatibility with PS2 hardware is significantly lower. Verbatim DVD-R discs are the most reliable brand for PS2 compatibility.
Step 3. Confirm your PS2’s system language is set to English in the Settings menu. FreeDVDBoot requires English to trigger the exploit correctly.
Step 4. Copy biosdrain.elf to the root of your FAT32-formatted USB drive.
Step 5. Insert the FreeDVDBoot disc into your PS2 and power on. uLaunchELF launches automatically from the disc.
Step 6. Plug in your USB drive. Navigate to mass:, locate biosdrain.elf, press Circle to run it, and wait for “Finished Everything.”
If the disc does not boot, burn a fresh disc on Verbatim DVD-R media at exactly 4X speed. Some older PS2 optical drives are very particular about disc brand and burn quality.
Dumping Method 3: Fortuna — Alternative for Unsupported Models
Fortuna is a softmod similar to FreeMcBoot but designed for PS2 models that FreeMcBoot does not support. It exploits a different system vulnerability to achieve the same homebrew loading capability from a memory card. Fortuna memory cards are sold on some marketplaces, though they are rarer and harder to find than FreeMcBoot cards.
A modern open-source version called OpenTuna is also available. Once Fortuna launches, the BIOS dumping steps are identical to the FreeMcBoot process. Navigate to biosdrain.elf through uLaunchELF, run it, and wait for the dump to complete.
Dumping Method 4: Hardware Modchip — Important Warning First
If your PS2 has a hardware modchip installed, you must disable it before starting the dump. An active modchip causes incomplete or corrupted BIOS dumps. This is documented by both the PCSX2 team and the PS2 homebrew community.
Consult your specific modchip’s documentation for the button combination that disables it. Once disabled, use the modchip to install FreeMcBoot onto a memory card and then proceed with Method 1 rather than attempting to dump with the modchip active.
What the Output Files Mean
After biosdrain finishes and shows “Finished Everything,” your USB drive contains multiple files. Every single one matters.
| File | Approximate Size | Purpose |
| SCPHxxxxx.bin | 4,194,304 bytes exactly | Main BIOS firmware |
| rom1.bin | 256KB | DVD player firmware module |
| rom2.bin | 512KB | Extended ROM data |
| erom.bin | 1MB | DVD player executable code |
| nvm.bin | 1KB | Non-volatile memory and settings |
PCSX2 requires all of these files in the same folder to function correctly. Missing supporting files cause specific games to crash or behave incorrectly, even when the main BIOS file loads without errors.
Understanding the BIOS File Naming System
This information is missing from almost every dumping guide online, and it helps you understand exactly what version you have.
A BIOS file named ps2-0230a-20080220.bin breaks down like this. The number 0230 is the BIOS version number. Higher numbers are newer versions. The letter a is the region code, where a means America (NTSC-U), j means Japan (NTSC-J), e means Europe (PAL), and c means China (NTSC-C). The final number 20080220 is the release date in YYYY-MM-DD format, meaning February 20, 2008.
When multiple BIOS versions exist for your region, newer versions generally offer better compatibility. However, some older specific games occasionally run more accurately on earlier BIOS versions due to firmware differences. PCSX2 allows per-game BIOS selection if needed.
Verify Your Dump With a Hash Check
Most guides skip this completely. It is genuinely important.
A corrupted BIOS file does not always produce an obvious, immediate error. Some corrupted dumps load games but cause audio glitches, random crashes, or save data problems that appear hours into a session. Verifying the hash before you open PCSX2 eliminates this entire category of problems permanently.
The ReDump project and PCSX2 community maintain a database of SHA1 hashes for every legitimate PS2 BIOS version ever manufactured. After copying your dump files to your PC, run a hash check and compare the result.
Windows Command Prompt:
certutil -hashfile SCPH-39001.bin SHA1
macOS or Linux Terminal:
shasum -a 1 SCPH-39001.bin
Compare the output string against the hash in the PCSX2 BIOS verification database for your model number. A match confirms your dump is complete and unmodified. If it does not match, repeat the dump with the same USB drive or try a different one.
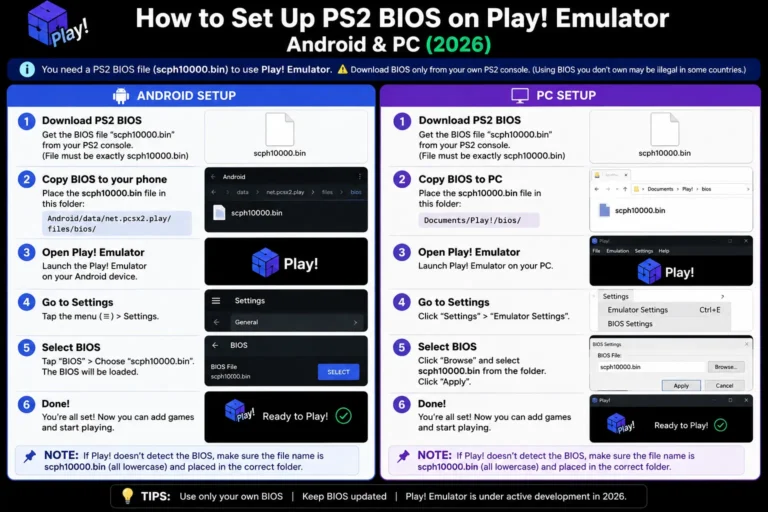
Loading the Dumped BIOS Into Each Emulator
PCSX2 on Windows and macOS
Copy all dump files into your PCSX2 BIOS folder. The default Windows path is Documents > PCSX2 > bios. On macOS, use Library > Application Support > PCSX2 > bios. Open PCSX2, go to Settings > BIOS, click Browse, navigate to your BIOS folder, and select your regional version. PCSX2 shows a green check mark next to verified valid dumps. A red icon means the file is corrupt, misnamed, or missing supporting files.
AetherSX2 and NetherSX2 on Android
Create a folder named PS2 on your internal storage and place all dumped files inside it. Launch AetherSX2 or NetherSX2, tap the plus icon on the Import BIOS screen, navigate to your PS2 folder, and select the main BIOS file. All supporting files in the same folder are detected automatically.
RetroArch on PC
Navigate to your RetroArch system folder by checking Settings > Directory > System/BIOS for the exact path. Inside that folder, create a folder named pcsx2 in lowercase, then create a folder named bios inside that. The complete path should read retroarch/system/pcsx2/bios/ with your dump files placed inside. Folder names must be lowercase on macOS and Linux.
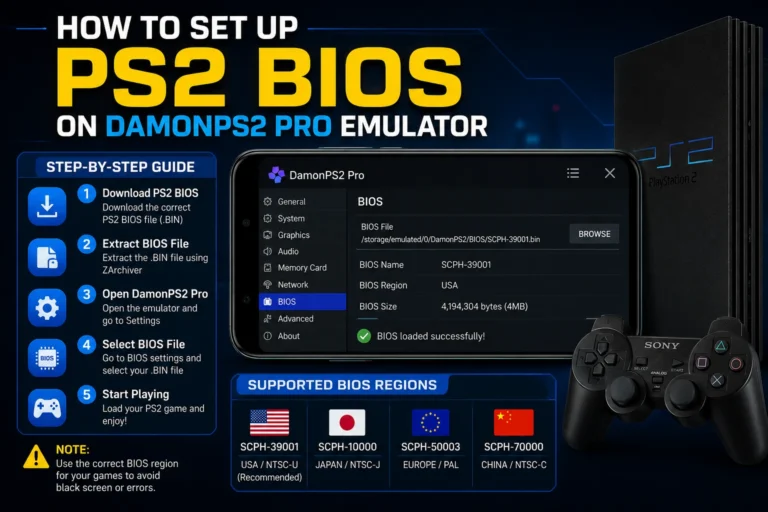
DamonPS2 on Android
Open DamonPS2, go to Settings, tap PS2 BIOS, tap Browse, navigate to the folder containing your dump files, select the main BIOS .BIN file, and save. DamonPS2 accepts the same .BIN file format produced by biosdrain.
Common Errors and Exact Fixes
USB drive not detected under mass: in uLaunchELF. Switch to a USB 2.0 drive in the 1GB to 16GB range. Format it as FAT32 with MBR partitioning using Rufus on Windows or Disk Utility on macOS. Confirm biosdrain.elf is in the root folder and not inside any subfolder. If still not detected, try creating a 1GB partition and leaving the rest of the drive unformatted.
Dump takes too long or appears to freeze. The PS2 USB interface operates at USB 1.1 speeds, which is significantly slower than modern USB standards. A complete dump can legitimately take up to 15 minutes, depending on your model. Do not interrupt the process. Wait for “Finished Everything” before touching anything.
PCSX2 shows a red icon next to the BIOS file. The file is either renamed from its original biosdrain output name, corrupt, or missing supporting files. Rename it back to the original name. Confirm rom1.bin, rom2.bin, erom.bin, and nvm.bin are all present in the same folder. If the red icon persists, run the dump again and verify the hash.
The FreeDVDBoot disc does not boot the console. Burn a fresh disc on Verbatim DVD-R specifically at 4X speed. Confirm your PS2 language setting is English. Check the FreeDVDBoot GitHub compatibility list to verify your exact SCPH model is supported by the ISO version you downloaded.
The late Slim model does not respond to the FreeMcBoot memory card. Models in the SCPH-9000x series with a date code larger than 8B do not support FreeMcBoot. Switch to the FreeDVDBoot method with the appropriate ISO for your model.
Hash check does not match any known version. Re-run the dump using the same USB drive. If it still does not match, try a different USB 2.0 drive. Some PS2 models have regional or production variants with firmware versions not yet catalogued in common databases. If PCSX2 accepts the file and shows a green checkmark, the dump is functional regardless of the hash database status.
Modchip is causing corrupted files. Disable the modchip using its specific button combination before beginning. Install FreeMcBoot onto a memory card and use Method 1 without the modchip active.
After Dumping — Protect Your BIOS File
Keep a backup copy of your complete dump in a safe secondary location. Google Drive, Dropbox, or an external hard drive all work. The PS2 is now over 24 years old, and optical drives in these consoles do fail. A backup means you never need to repeat the dumping process.
You can legally use your dumped BIOS on all of your own devices simultaneously. Loading it on your PC, laptop, and Android phone at the same time is personal use and is legal in most jurisdictions. What you must not do is share the file online, upload it to hosting services, or distribute it in any form. The PS2 BIOS is copyrighted Sony firmware, and distribution is a copyright violation.
Frequently Asked Questions
Is dumping the PS2 BIOS legal?
Yes. Dumping BIOS firmware from a PlayStation 2 console you personally own is legal for personal backup and emulation use in most countries. The BIOS is copyrighted by Sony, so downloading it from third-party websites and sharing dumped files are copyright violations. Always verify the specific laws in your country.
Does this process damage my PS2?
No. FreeMcBoot, FreeDVDBoot, and biosdrain make zero permanent changes to your console’s hardware or firmware. The PS2 BIOS chip is not flashable, meaning it cannot be overwritten or bricked by the dumping process. Your console functions exactly as it did before after the dump completes.
How long does the full process take?
The biosdrain dump itself takes 1 to 5 minutes on most models and up to 15 minutes on some Slim hardware. Including USB preparation, file transfer, and verification, most users complete the entire process in under 30 minutes.
Can I use the same dumped BIOS file on multiple devices?
Yes, as long as all devices are yours and you are not distributing the file. Using your personal dump on your home PC, laptop, and Android phone at the same time is legal personal use.
Why does PCSX2 show a green checkmark on some BIOS files?
The green checkmark means PCSX2 has matched your file against its internal database of verified known-good PS2 BIOS dumps. A file without a checkmark may still work, but has not been verified against a known hash. A red icon means the file is invalid, corrupt, or misnamed.
What happens if I use the wrong region BIOS for a game?
Using a USA BIOS with a PAL game causes the game to run at an incorrect speed. Many PAL games run at 50Hz while NTSC hardware operates at 60Hz. This mismatch produces slow, stuttery gameplay and audio sync problems. Always match your BIOS region to your game’s region for the best performance.
Do I need to dump again if I upgrade to a new version of PCSX2?
No. PCSX2 maintains backward compatibility with all legitimate BIOS dumps. A dump made on any version of PCSX2 works on all future versions. Your file never needs updating.
Final Thoughts
Dumping the PS2 BIOS from your own console is the right foundation for any PS2 emulation setup. It takes less than 30 minutes, produces a clean verified file, and permanently eliminates an entire category of setup problems that downloaded files routinely cause.
Choose the method that fits your console, follow the steps, verify the hash, keep a backup, and load it into your emulator. After that, your BIOS works forever.
The PlayStation 2 library has over 4,000 games. Your legal BIOS opens access to every single one.